Master the notes on the guitar in 3 easy steps
 The notes on the guitar all over the fret-board tend to be a mystery to most guitarists. Learn to unlock the notes on the guitar in these 3 simple steps.
Master the notes on the guitar in 3 easy steps.
There’s an extremely simple method that I have used for years when teaching the notes on the guitar neck. After running the process daily for 2 weeks, my I’ve never had to address the topic with my students again. There’s no magic trick, it’s simply a system for recognising and understanding the patterns that develop around the guitar. To a new student, the guitar can seem like a daunting instrument. Apart from the fret markers, there doesn’t seem to be any real structure in the way the strings and frets align. As they get into the process of learning, they find that this isn’t the case at all. The guitar lends it self to patterns in almost all aspects of playing. Scales, chords and arpeggios are easy shifted into new keys by simply using the same patterns in different positions of the fret-board. So why is it that all the notes on the guitar still remain elusive to most guitar players? In my experience I’ve found that students didn’t see the value in knowing. Once they realised that they could play using patterns alone, the notes seem to become unimportant. To be honest I can see the point, however students would only have perceived value in a technique based on their current level of skill. How would a student be able to adapt faster and understand concepts quicker if they know all the notes? If they never learned them, they’d never know. I found that that like most things, knowledge is power. Students that could easily recognise notes that they were playing would gain a deeper understanding of not just the guitar, but music in general. So with the ‘why’ addressed, lets look at the ‘how’. This technique involves 3 steps. Step 1: Learn the Low 2 strings Step 2: Learn the formula Step 3: Practice the routine.
Master the notes on the guitar: Step 1
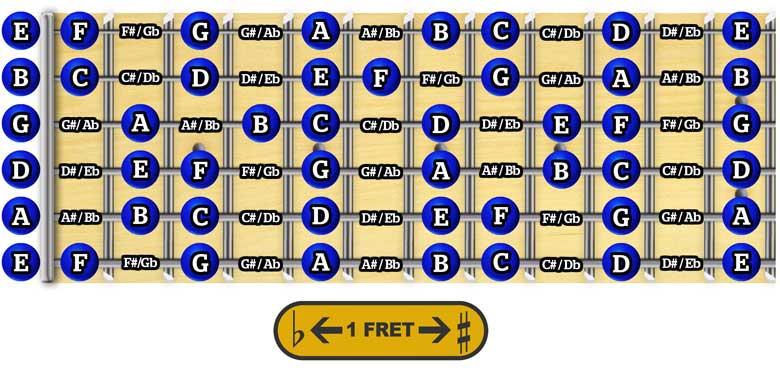
Most guitarists would already have an understanding of the low E and A strings. The basics behind playing in different keys and shifting chord and scale patterns up and down the fret-board would already have started you on your learning curb covering the whole neck. If you are starting from scratch you will need to continue reading on here before you jump onto step 2. If not, jump straight ahead to step 2. Start with the 2 open strings. E and A. Both these notes are repeated again an octave higher on the same strings at the 12th fret then again at the 24th fret (if available). Note that the fret markers have the double dot inlays on these frets.

You will notice that between the open and 12th frets, you have 4 single dot inlays. These inlays are also repeated after the 12th frets indicating the same notes an octave higher. The First inlay is at the 3rd fret indicating that the note on the E string would be G and the note on the A string is C. Moving up to the 5th fret, we would have A on the E string and D on the A string. There are two more “main” notes on the 5th fret or below on the E and A strings (notes without sharps or flats). These two notes are F on the 1st fret of the E string, and B on the 2nd fret of the A string.

For the higher half of the fret-board we have another set of 2 fret markers with another set of ‘Main Notes’ that are unmarked. On the 7th fret we have the B and below it the E while on the 9th fret we have the C# and F#. This means that in-between the inlays is where the actual C and F fall. Remember that E and F as well as B and C are both semi-tones apart. This would be a single fret.

The last two notes to that you’ll need to address before step 2 are D on the 10th fret of the E string and G on the 10th of the A.

As far as sharps and flats go, to make a note sharp, raise it by a single fret and to flatten, lower it by a single fret.

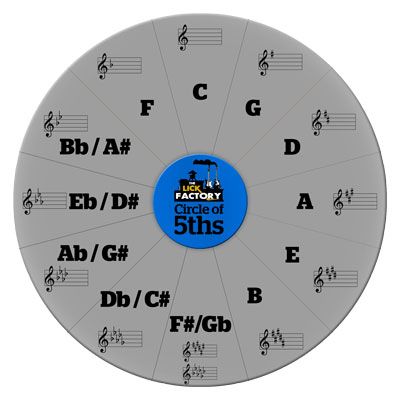
To rehearse these notes I like to use the circle of 5th. This is a theoretical concept demonstrating all the key signatures as makes a great pattern for jumping around and practicing notes and key changes. Using the Circle, you start at C playing the note on the E string then the A string. Moving around clockwise play each note following the same pattern. Once you reach the F#, continue moving clockwise playing the sharps until you reach F. AT this point change the direction to counter clockwise and move through the flattened notes until you finish on Gb. It’s important to do this exercise using a metronome. Give yourself 4 beats to get to each note to start. You want to ensure that you are hitting the note cleanly and visualising where it is before you go to play it.
Master the notes on the guitar: Step 2
The next step in learning all the notes on the guitar is about recognising the where the same notes fall in relation to those on the E and A strings. I mentioned earlier that the guitar is an extremely patterned instrument. The formula for finding all the same notes really reflects this. The notes on the D (4th) and the B (2nd) strings can be easily found by referencing the same note on the low E(6th) string. From the note on the E sting, move down 2 strings to the D string and then up higher by two frets. This is the same note an octave higher. If you repeat this process but move up 3 frets, this will give you the same note again one more octave up. The beauty of this pattern is that it’s exactly the same when referencing the notes on the A string. 2 strings down, 2 frets up then 2 strings down, 3 frets up.
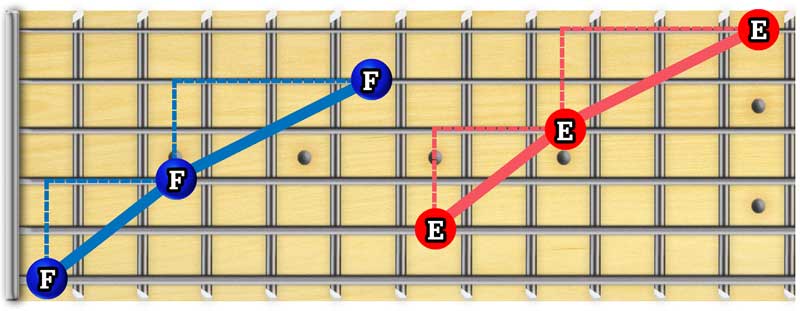
You’ll be able to quickly check yourself as obviously the notes on the Low E string and High E strings should be on the same fret.
Master the notes on the guitar: Step 3
The 3rd Step is learning all the notes on the Guitar, is to Practice the routine. The way in which you practice the notes is vital in being able to recognise notes immediately. We started the process for learning the notes on the E and A strings in step 1. But incase you skipped it well quickly run through it again.  Use a metronome and begin with the intent on playing a single note every four beats. I use a great metronome app on my iPhone, check it out here. You will be using the Circle of 5th to dictate the order. Beginning at C, play the note on the 6th, 5th, 4th, 3rd, 2nd and 1st strings in order without dropping time. Once complete move clockwise around the Circle to D and repeat the process. Once you reach notes with enharmonic equivalents (One sound with 2 names like F#/Gb), you continue clockwise playing all the sharps. Once reaching F, change to a counter clockwise directions running through the flats. The following exercise demonstrates the practice format through C and G.
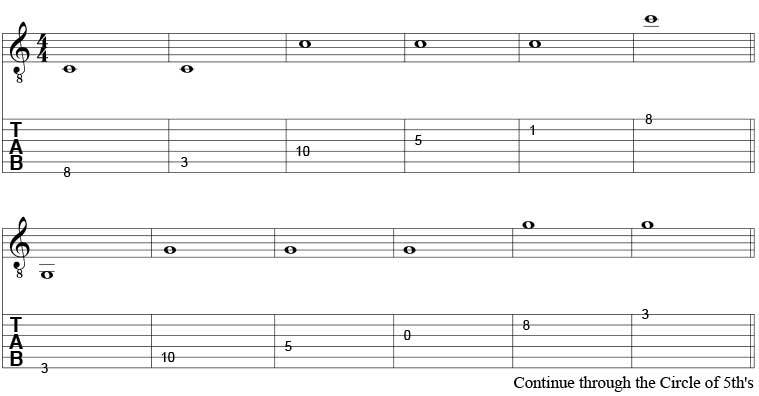
Do this daily and before you know it the notes on the guitar will no longer be a mystery.
This article is based on concepts from the LICK FACTORY’s Preliminary Lessons. Everything you need to know to get started on your musical journey.
Need a quicker fix? the ULTIMATE CHORD GUIDE: Volume 1 might be the answer.
Who’s your Teacher?

Kris Petersen is a name that has become synonymous with the Australian Music Industry. From clubs to stadiums, Kris has performed on every continent in the world and shared the stage with some of the world’s greatest artists.
In the last few years alone, Kris has performed with, or alongside Alice Cooper, Aerosmith, Orianthi, Van Halen, Billy Joel, Matt Sorumn (Guns n Roses), Eric Martin (Mr. Big), The Drifters, Tony MacAlpine, Buckcherry, Daryl Braithwaite, The Living End, Icehouse, Marcia Hines, The Screaming Jets, The Choirboys, Mental As Anything, Bruce Kulick (KISS), Leo Sayer, Pretty Boy Floyd and many more… read more


